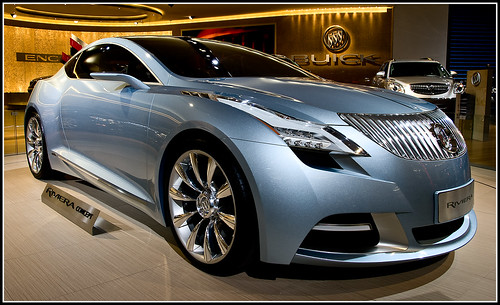
This is a shot that I took of the Buick Riviera Concept car which was on display at the 2008 North American International Auto Show in Detroit, Michigan. The organizers of the show set aside an hour one morning for photographers. If you had a camera, you could get in an hour early to take pictures before the crowds started arriving at 9 am. This made it much easier to take shots of the cars without worrying about people getting in your shot.
This particular image was somewhat of a challenge to take. The car itself was on a rotating platform which meant that the shutter speed had to be fast enough to prevent blurring. There was also a short glass wall around the platform which limited the angle at which you could take the shot. For this shot I used my 14-54mm telephoto set to the wide end. My Olympus E3 is based on a four-thirds sensor, so 14mm is equivalent to a 28mm lens on a 35mm camera. I wanted to get close to the front of the car and shoot along the side to give a feeling of power and drama.

The processing on this shot was fairly minimal. It consisted mostly of making some adjustments in Camera Raw, a mild curves adjustment in Photoshop, some sharpening and then adding a layer which darkened the areas surrounding the car in an effort to draw more attention to the car itself.
To the left is the image as it came out of the camera. It was shot in raw, so this image was created by simply opening the image and saving it as a JPEG without any processing.
The image below is a snapshot of the Camera Raw file settings used for this image. The first thing I did was to crop the image a bit. I didn't like the ceiling lights and I wanted to focus more on the car. Had I been able to this in-camera, I would have, but I wasn't. If you look at the settings on the right side, I made some minor changes to the white balance and increased the blacks up to 29 or so and up the clarity setting. From here I took the image into Photoshop where I adjusted the contrast, did some sharpening and added a vignette layer.
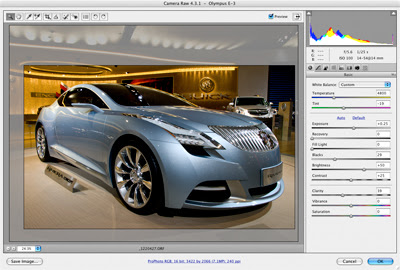
For the vignette, I created a New Layer and selected 'Soft Light'. I clicked the 'Fill with 50% gray' option and then painted on the new layer with a dark brush. I decreased the opacity on the brush so I could better control the effect. Once I was done, I reduced the overall opacity of the layer to about 53%.


