Friday, August 29, 2008

Thanks!

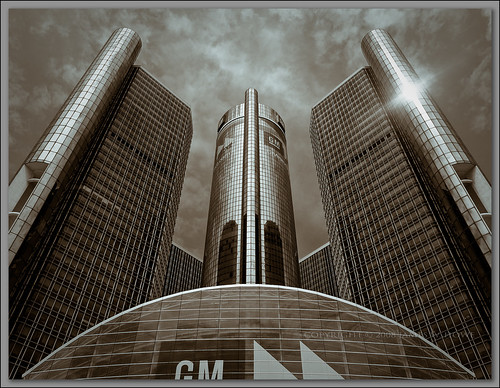
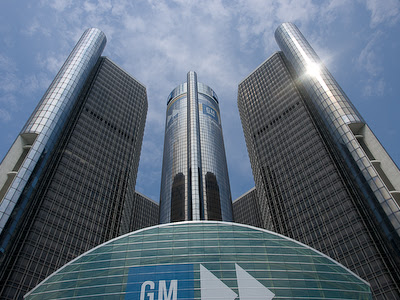
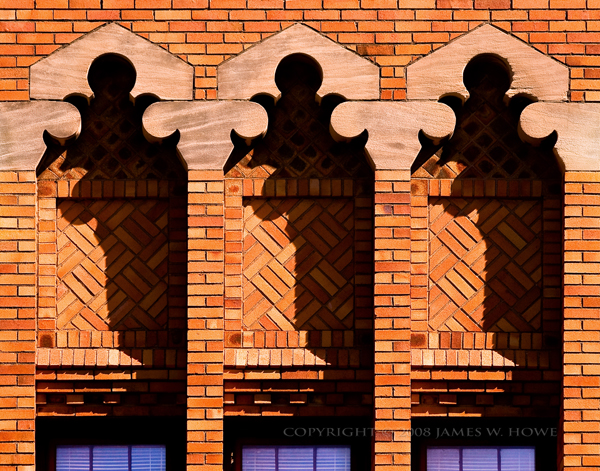
Recently I had the pleasure of attending the Detroit edition of Scott Kelby's Worldwide Photowalk. Scott has written a new book on Lightroom 2.0 and as a way of celebrating its release he decided to arrange for 'photowalks' in numerous cities. Each photowalk was limited to 50 people, but some cities had more than one photowalk. The idea was so popular that there were photowalks in more than 237 cities world wide. As part of the event prizes were given out. The leader in each city picked a winner from their photowalk. That winner won a copy of Scott's new Lightroom 2.0 book. Each of these winners was then in the running for a grand prize. In addition to the grand prize, there were also 10 runners up who won a prize as well. Well, Scott announced the winners today on his blog and I'm honored to be one of the 10 runners up with my Renaissance Center image.


Given the high quality of the images that were submitted for the photowalk (search Flickr tags for 'scottkelbyphotowalk', or just search for "Scott Kelby's Worldwide Photowalk") it is quite an honor to be selected not only as best for the Detroit photowalk, but to be one of the 10 runners up. I'd like to thank Scott for having this event, and to Terry White for running the Detroit photowalk. I had a great time wandering around the Detroit riverfront area taking pictures with a bunch of other photographers. I hope this becomes an annual affair (prize or no prize.)


Thanks!

Sunday, August 24, 2008

Renaissance Center

Renaissance Center

This is a picture of the Renaissance Center located along the river front in downtown Detroit, Michigan. The building was built in the 70's with funding by Ford Motor Company and in an interesting twist, the building is now the world headquarters for General Motors. The building was designed by the same firm that designed Peachtree Center in Atlanta, Georgia and a similar facility in downtown Los Angeles (the name escapes me). This shot was taken during the the Detroit edition of Scott Kelby's Worldwide Photowalk. The photowalk was meant to celebrate the publishing of Scott Kelby's latest book on Lightroom 2.0. Up to 50 photographers in over 200 cities world wide participated in the photowalk.


This is the shot as it came out of the camera. There is a slight tilt to the shot and the color is a bit flat. I used the tools in Lightroom 2.0 to straighten the image and also adjust the exposure and perform the conversion to black and white. One of the things that I wanted to bring out in the image was the character in the sky. When I took the shot I was already thinking that it would look good in black and white. I knew the blue sky could be darkened a bit to create some more drama. However, as I was working on the image I debated about just keeping it in color, but as you can see, I ultimately decided to go with black and white.


These are the settings I used in Lightroom to get the exposure where I wanted it. I left the exposure slider about the same, but I used recovery to bring out a bit more in the sky, and I used the black and fill light to add a bit more contrast to the building without losing detail.


The conversion to black and white was done using the Grayscale palette. I wanted to darken the sky so I reduced the blue, and then I used the color selector tool to selectively brighten or darken parts of the image. I finished things off using the split tone functionality.


Some additional changes were made in Lightroom including adding a bit of clarity and some sharpening. I finished the image off in Photoshop, mostly to do some final sharpening and to add a border to the image.


The image was taken with an Olympus E-3 using the 14-54mm lens at 14mm (28mm full frame equivalent). Exposure was 1/400 at f/8.0 using ISO 100.


Comments and constructive criticisms welcome.


Image available for purchase at my ImageKind gallery.


Thanks for looking in!


Images and text Copyright © 2008 James W. Howe - All rights reserved

Tuesday, August 19, 2008

809 Kingsley


This image is of a local apartment building located near the University of Michigan medical campus. This part of town has many rental units, but most are either converted houses or more mundane apartment buildings. This building was built in 1929 and is a great example of the Mediterranean Revival architectural style. I took the shot mid-morning when the sun was shining on it at a nice angle and I really liked the strong shadows created by the unique architectural elements. I wasn't able to get the shot of the building straight on, there were people working on a house across the street which prevented me from getting a good angle. I ended up taking the picture from a slight angle and then relied on Photoshop to help with some perspective correction.


The image above is the 'as shot' version of the image. As you can see, the image has a bit of perspective distortion because was forced to take the picture from a slight angle. The image also tilts back a bit since I had to shot at a slight upward angle. When I took the shot I figured I would have to do some perspective correction, so I made sure that I framed it a little wide so I would have extra pixels to deal with.


The layers palette above only shows part of the story of the processing. I started in Lightroom and made adjustments to bring out the color in the brick. The shot was taken in bright sunshine, and the raw image sort of washed out the vibrant color that I remember seeing when I took the picture. In Lightroom I increased the black level a bit and increased some of the contrast. I adjusted the exposure and recovery a bit to bring out the color in the brick.

The remainder of the processing involved performing some perspective correction and some curves work to bring out the color of the windows in the lower part of the image. When I took the shot, I noticed the blue sky reflecting in the windows and I thought it made an interesting color combination with the orange/red brick. As I processed the image, the window color sort of got lost, so I added a curves layer to focus on just the windows. I finished off with a dodge/burn layer to brighten the windows up just a bit more.


This image was taken with an Olympus E-3 DSLR using a 70-300mm Zuiko lens. This lens has a 35mm FOV equivalent of 140-600. The lens was zoomed to 141 or the equivalent of 282mm on a 35mm camera. Exposure was 1/400 at f5.6.


Comments and constructive criticism/suggestions are welcome. This image available for purchase at my Color gallery at ImageKind.


Image and text Copyright © 2008 James W. Howe - All rights reserved

Thursday, August 7, 2008

Duesenbird


This is shot of the hood ornament (mascot) of a 1935 Duesenberg Model JN. This particular Duesenberg was a gift to Clark Gable from his wife, Carole Lombard. The Duesenberg was one of many fine automobiles on display at the 2008 Concours d'Elegance held at Meadowbrook Hall in Rochester Hills, Michigan. The background of this shot is actually a 1934 LaSalle owned by auto executive Robert Lutz.

Shooting cars in the 'wild' is always a challenge. You have to deal with crowds, weather, distracting reflections, etc. An ideal day for shooting would be overcast where the light is even. Unfortunately the day of the event the weather was too nice, blue skies and no clouds. When I took this shot, the car was under some trees so the lighting was a bit more diffuse, but there were still plenty of reflections to deal with. As you can see in the 'as shot' image below, there was quite a bit of green reflecting in the chrome. The nice thing is that the curve of the chrome helped make the reflections a bit more abstract. You can make out the sky and trees, but you don't see a lot of people or defined shapes.


My first attempt at processing involved simply using Lightroom 2 to do all the adjustments. I increased the blacks a bit, increased contrast and got an image that was quite nice. However, the more I looked at the image the more I thought that a black & white conversion would produce a better image. For one thing, it would make the images in the reflection a bit more abstract. I also thought it would focus the eye more on the details themselves rather than the color.


To the left you see the layers palette for the black & white conversion. There wasn't much processing needed. I started with a basic black & white adjustment layer. I lightened the background a bit and darkened some of the grillework. After the basic conversion, I added a curves adjustment layer to increase the contrast. I also wanted to bring out the Duesenberg badge so I added another curves layer which dramatically lightened the image. I used a layer mask to mask out all but the badge. I finished things up by using the Emboss filter in Overlay mode to sharpen the image.


This image is available for purchase in my Black & White gallery at ImageKind.