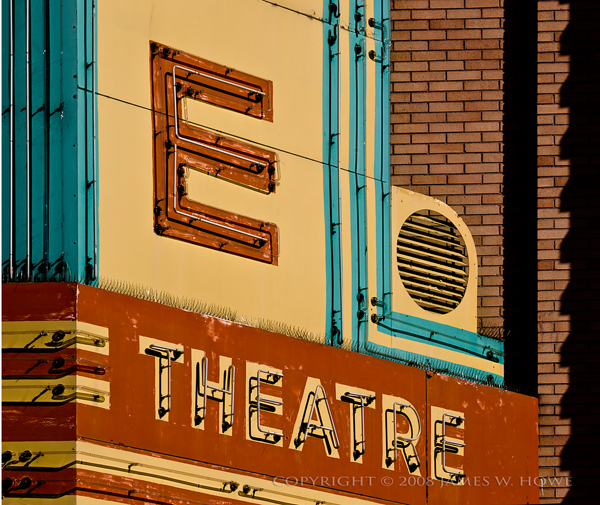
This is a close-up shot of the marquee of the State Theatre in Ann Arbor, Michigan. This theatre was designed by C. Howard Crane and built in 1942. Crane also designed the ornate Fox Theater in Detroit. Most of the exterior of the theater is still intact, but inside the theater was cut up to create 4 theaters over two floors. Later the bottom two theaters were removed and converted to retail space.
I've always been attracted to the signage of this building. It has great Art Deco elements and I like the vivid colors. Even though the sign has seen some wear, it is still quite impressive. I was going through some shots I had taken of the theater and I was playing around with the zoom tool in Lightroom. I had zoomed in really close in one image and I really liked the extreme close up. It gave the image a bit more of an abstract feeling to it. I decided I needed to go back and use my 70-300mm lens (2x crop factor) and take some close up shots. I've posted a series of them on my Flickr account. I choose this one to post here because I liked the variety of elements in the shot. I like the color and shape of the sign, combined with the pattern of the brick and the shadow line along the right side.

The finished image has had some work to get it to where it is. The image above is the raw image as it came out of the camera. The shot was taken mid-afternoon and the sun was shining directly on the sign. This had the effect of creating some nice shadows, but it also washed the color out. I really wanted to emphasize both the color of the sign, but also the age of the sign as well. In order to do that I worked to improve the contrast, and pump up the colors. Most of the work was done in Lightroom 2.0. I used the blacks slider to add a bit of contrast. I used the vibrance slider to bring out some additional color in the brick and I used the individual saturation and luminosity sliders to bump up particular colors in the sign.
When I was mostly finished in Lightroom, I took the image over to Photoshop CS3. I noticed that the color of the wall seemed to have a bit of a greenish cast, so I used the color balance tool to make it a little redder and browner. The original shot also had more dark wall to the right which I felt distracted from the main element. I liked the shadow cast by the bricks so I kept that, but I trimmed away most of the dark area of the image. The other thing I did was to skew things a bit to straighten things out. I had to shoot this from down below and I didn't have the benefit of a tilt/shift lens, so I used the free transform tool in CS3 to move things around a bit. I finished up with some sharpening and a little vignette.
Image Details
The image was taken with an Olympus E-3 camera. The lens was the Zuiko 70-300 which gives a 35mm effective focal length of 140-600. The shot was taken with the lens zoomed to 92mm (184mm). Exposure was 1/250 @ f/13 at ISO 100.
Please feel free to leave comments or feedback. I would also appreciate it if you would visit my gallery at www.jameshowephotography.com. If you have any feedback about the gallery itself, please leave those comments here.
Text and images are Copyright © 2008 James W. Howe - All rights reserved