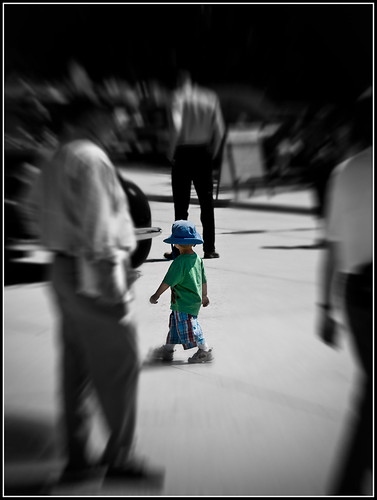
I recently attended the 2008 Motor Muster held at Greenfield Village in Dearborn, Michigan. The show brought together more than 700 cars from the 30's through the 70's. I was there to take pictures of the automobiles. I'm not generally a people photographer. However, when I saw this little boy wandering around I just knew I had to get a shot of him.
I was just about done shooting for the day when I noticed him. He was walking around like he owned the place, very determined to get somewhere. He wasn't lost and his mother was nearby. I was using my 70-300 lens on my Olympus E-3 at the time (35mm effective focal length of 300-600mm) and I was trying to get a shot as he darted in and out of the spectators. I finally managed to get this show, along with a few more. I really liked this shot in particular because it really gives the feeling that this boy is very self-confident and knows exactly what he wants.

My goal in processing was to make sure that the boy was the center of attention. As you can see in the unprocessed image to the left, the boy is in focus, but the elements around him are only minimally out of focus. Even though I was using my 70-300, I was at 70mm f4 which doesn't provide the shallow DOF that I would have had if I had been at something like 300.
I did some basic processing in Camera Raw, adjusting white balance, exposure, etc. before launching Photoshop. Once in Photoshop my goal was to bring more attention to the boy. Since the other elements in the image were too sharp I decided to try the Focal Point Photoshop plugin by OnOne Software to see what I could do.
The Focal Point software lets you define the area of your image that you want sharp and lets you set different parameters for how much blur, type of blur, feathering of the blur, etc. It's all done with a control that they position over your image. You simple drag the focus point around, drag some points (similar to the way the pen tool works) to expand or contract the area of focus, and drag some different controls to set the blur type and amount. It's all very visual and quick. I'm not sure that I do this sort of work enough to warrant purchasing the product (I was using an evaluation copy) but it is definitely a slick product.
After getting the selective focus where I wanted, my next step was to darken everything except the boy. I used a curves adjustment layer in combination with a layer mask. I darkened the image and then used to mask to restore the original lightness level to the boy. I followed this up by using the Lens Correction tool to add an additional vignette to further darken the edges of the image. I then sharpened the image, but only the boy, I masked out any sharpening from the rest of the image.
At this point I thought I was done, but I still thought the other elements in the image were distracting from the boy so I made one more change. I added a black & white adjustment layer to desaturate the colors from everywhere except the boy. I then applied a mask to make sure that the boy was in color. The end result is what you see at the top.
Please feel free to leave comments, questions or constructive criticism and thanks for looking in


1 comment:
Very thoughtful bloog
Post a Comment