
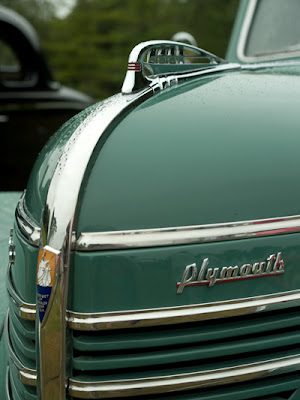
This image is of a 1939 Plymouth Deluxe Convertible Sedan taken at the 2007 Concours d'Elegance at Medowbrook Hall in Rochester Hills, Michigan. I was digging through some old photos, keywording, flagging and such, and I came across the shot from which this image was created. I had passed this image by several times, thinking that it was just too plain. The color of the car was sort of flat and there was a bit of background in the image which made the shot look more like a snapshot than a composed image. This time when I was looking at it, I realized that with just a bit of work I could eliminate the background and probably improve the overall look of the image, so I decided to give it a try.
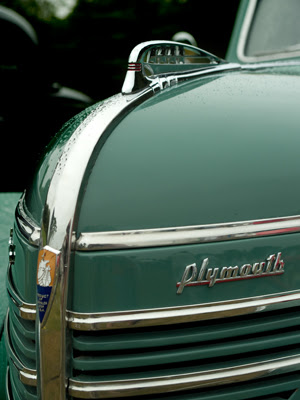
To the left you can see the image as it came out of the camera. The details on the car itself are relatively flat, the color is mostly unexciting. The upper part of the background isn't too bad since it is darker and provides some contrast with the car itself, but the lower part of the background is too close in color to the car and there is very little separation between the car and background. Green cars on grass tend to have this sort of problem. My processing goals were fairly simple, blacken the background (to create contrast and remove distractions) and improve the color and contrast of the car itself.
The first thing I did after bringing the image into Photoshop CS3 was to apply a curves adjustment layer. I used this layer to darken the entire image. This made the dark part of the background even darker (or completely black) and it helped create a little contrast between the car the the grassy area at the bottom of the image. At this point I wasn't interested in working on the car itself, so I created a layer mask to cover the car, leaving the adjustment layer to affect just the background area.

In this step, I used the brush tool to paint the dark area of the background black. Much of the upper left portion of the image was already black, so I just had to paint over the areas which weren't. I used a soft brush and zoomed way in to the areas I wanted to paint and carefully painted with the black brush.
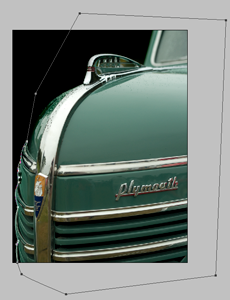
In Step 3, I used the pen tool to create a vector mask of the car. I placed points along the curved parts of the engine area in the lower right of the image and then quickly added additional points to capture the entire car. I then went back and zoomed in on my points and adjusted them so that the curves matched the curves of the car. Once I was satisfied, I selected Layer->Vector Mask->Create from path... to create a vector mask. I then created a blank layer below my current layer and filled it with black. The background was now black, but it still needed some tweaking.

When I zoomed into the background, I noticed that the line between the car and the black background was too sharp. In the original image, the background was fairly light so making it black with the sharp edge of the pen tool made the background look too fake. There are probably other ways to correct this, but my solution was to take a soft-edge brush at a lower opacity, and gently follow the curves of the car to soften the edge between the car and the background. I was using a Wacom tablet so this was a little easier than if I had been using a mouse. The image to the left shows the areas that I painted.
Once I had the background complete, I turned my attention to the car itself. My first step was to use another curves adjustment layer to increase contrast in the car, and darken it. I used Normal blending mode instead of Luminosity because I wanted the bump in saturation. I liked the deeper green created from the adjustment layer.
I then noticed there was some red reflecting in the chrome so I added a Hue/Saturation layer and eliminated the red. Of course, there is a bit of red in the hood ornament, so I used a layer mask to recover the red in that spot. I gave the image just a bit more saturation, which helped bring up the color in the badge on the front of the car.
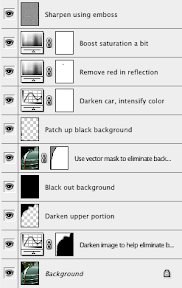
Finally, I used the Emboss filter to sharpen the image. I used a level of 4, desaturated the color, used Hard Light as the blending mode and reduced the opacity just a bit.
Overall I'm pleased with how this image came out.
This shot was taken with an Olympus E-500 with the Zuiko 14-54mm lens zoomed to 35mm (70mm if you use the 2x cropping factor). Exposure was 1/250 at f/4.0 using ISO 200.
Comments and constructive criticisms are always welcome.
This image and others are for sale at my Automobile Details gallery on ImageKind. Please check it out.
Image Copyright © 2007 James W. Howe - All rights reserved


1 comment:
the photo is beautiful and I like the black background you added but the lower part of the background is not background at all it is the green fender of the car, which you cut off.
Thanks
Mike
Post a Comment